onion.net Installation Manual
In your onion.net Download Center, a current onion.net distribution is available for download. Based on this, you can create a local onion.net runtime environment or perform an onion.net server installation.
The onion.net runtime environment is to be used on workstations and comprises all server components of a Windows desktop application. Thanks to this, it is possible to set it up quickly and to use it for learning, demonstration and development purposes. For the productive use of onion.net or for the evaluation of the product with several editors, we would like to ask you to perform an onion.net server installation. This manual installation needs to be performed directly on the target systems and comprises several Windows and ASP.NET services.
System prerequisites
For the installation of onion.net, the following prerequisites need to be fulfilled:
- Microsoft Windows XP or more recent version (onion.net runtime environment)
- Microsoft Windows Server 2008 R2 or more recent version (server installation)
- Microsoft .NET Framework Version 3.5
- Microsoft SQL Server 2008
The .NET Framework version 3.5 forms part of the automatic update since 2009 and may thus already be installed on the computer.
It is also possible to use the SQL Server 2008 Express R2 version as SQL Server that is available free of charge. The productive use is free of charge, but limited to a data volume of 10 GB.
Other requirements:
- Microsoft Internet Information Service (IIS), version 6.0 or highter
- Application Request Routing (ARR) for IIS 7 on the live system
 top
topCreate an independent onion.net runtime environment
Following the successful installation of an onion.net distribution, the start menu contains a new entry called "onion.net". All product versions of onion.net that have been installed will appear underneath this entry.
With just a few steps, the application "Create an onion.net runtime environment" generates a complete onion.net installation that can be executed independent from a web server or Windows services on work stations. Execute this application.
Greeting dialogue
This dialogue presents a short introduction to the application.
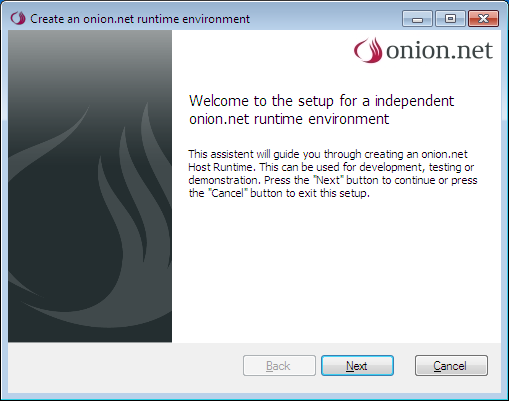
With a click on the button „Next“, you proceed to the first step.
Indication of an entity name and the target directory
Choose a self-explanatory name for the runtime environment and select a directory in which the setup will save the new runtime environment.
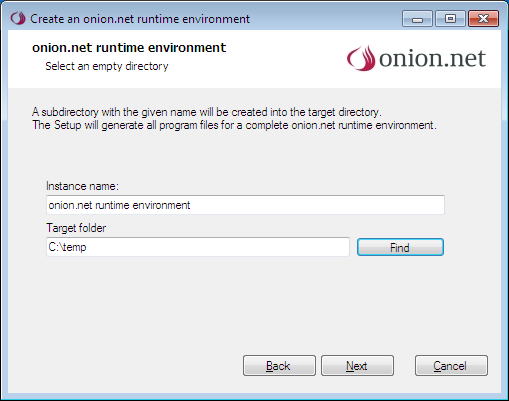
When the entries are correct, you proceed to the next step with a click on the button „Next“.
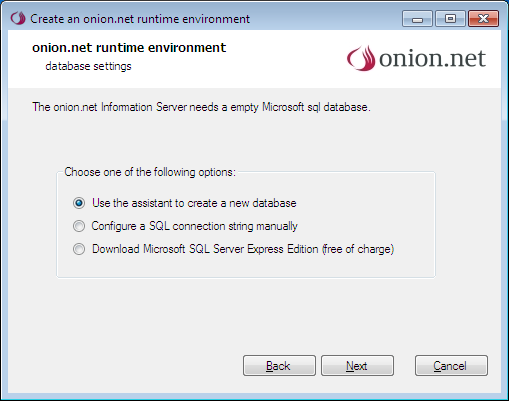
Database settings
The set-up requires access data to an empty Microsoft SQL database. The SQL server can be installed locally or be available within a network. If you have administrator rights of the SQL server, select the option "Use the assistant to create a new database". In any other case, ask your Administrator for an SQL connection string. In this case, select the option "Configure SQL connection string manually" and continue to read the next paragraph. If no SQL server is available to you in the network, you can download the variant offered free of charge on the internet. Via the option "Download Microsoft SQL Server Express Edition (free of charge)", you are directed to a website with download links and short installation instructions.
After selecting the option "Use the assistant to create a new database", a dialogue for connection to the SQL server will appear.
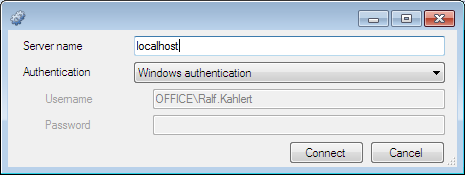
Your computer name has been preset for the connection. If you wish to use a local SQL server, please take care that the entity name is also included in the server name. The server name in case of an SQL Server Express standard installation, for example, reads "localhost\SQLEXPRESS". If SQL access data are available to you, you can enter these following selection of the authentification option "SQL server authentification". In any other case, the application will connect to the database with the user currently logged in.

When the connection has been successful, the assistant will display some information on the version and edition of the SQL server in the server properties area. You may read a notice that a missing full-text search of the SQL server could have a negative impact on the performance of the research function. However, this does not affect the functions of the server.
Choose a database name for the new database and click on the button "Create database". Following the successful creation of the database, the assistant will be closed and you will be directed to next step of the setup.
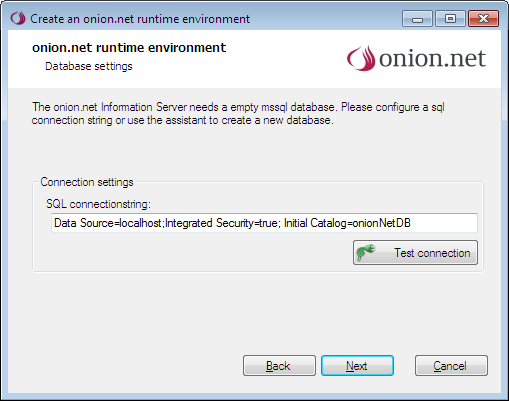
Manually configure the connection string
If desired, you can manually adjust the connection string in this step and check it once again via the button "Test connection".
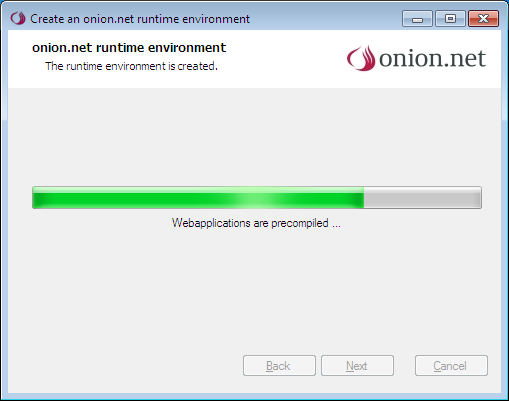
Runtime environment is created
You have now gathered all pieces of information required for creating a runtime environment. In the target directory, all server components required will now be compiled in an executable Desktop application.
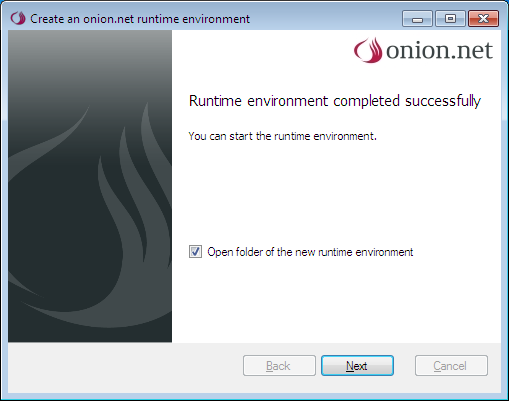
Runtime environment completed
The runtime environment has now been created and can be started in the target directory.
topFirst steps using the onion.net runtime environment
The newly created runtime environment directory now contains three entries.
onion.net compromises all Windows services and webapplications. This allocation you will see in the folder structure „runtime“ and „webapps“. Start the runtime envorinment by clicking the link „Run onion.net runtime environment“ now.
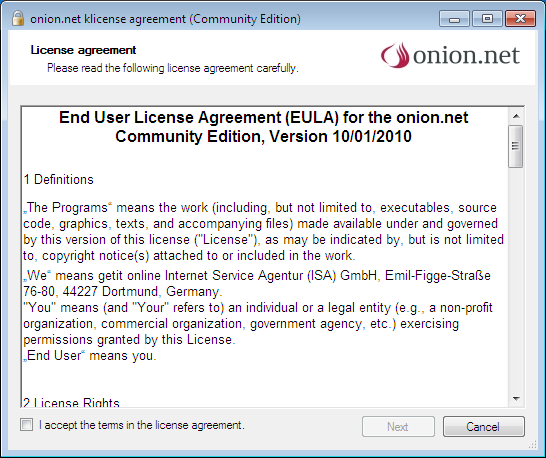
Accept the license agreement
Please read the license agreement and accept with „I accept the terms in the license agreement“.
The activation of the button „Next“ will run the application.
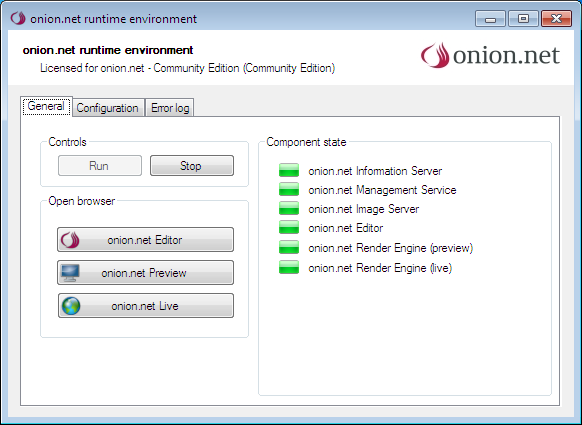
onion.net runtime environment
The runtime environment offers you some possibilities for configuration and verification, plus web links to your editor, preview and live environment.
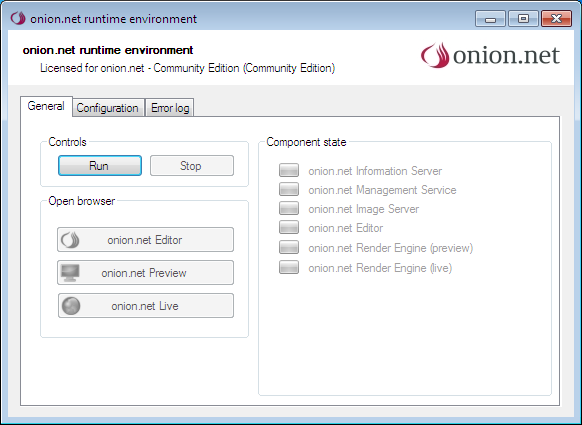
In general you should run the runtime environment directy. If a conflict appears the application changes to the configuration tab and refers to the conflict.
While startup you can see the progress in the section „Component state“. Each webapplication which is running will activate a button in your control panel.
Open the onion.net Editor
A click on the button „onion.net Editor“ will open the web based login form:
Now you can login to the system as administrator. Type „admin“ for the username and password. Submitting the form opens the empty onion.net system.
Activate the module system
If you want to add prototypes or examples to the editor you have to activate the module system. You will find an assistant in the contextmenu of the root element.
The newly created element „Editor“ manages all installed modules. A right click on the element offers you the option „Import module“.
The assistant offers you to import new modules. You will find modules, tutorials und more information on this website.
topExecute the server installation
After the WindowsInstaller onion.net has been installed, you will find the current distribution of onion.net in your program directory. The distribution directory now contains the following directories:
| Component/directory | Type of service | Short description |
|---|---|---|
| onion.net Information Server | Windows service | Central server for any XML scheme-based data, users and rights etc. |
| onion.net Editor | ASP.NET | Web-based editing surface for content collaboration. Additionally, it serves as administrative tool of the data model and for the administration of users, groups and rights. |
| onion.net Render Engine | ASP.NET | Web-based unit for processing any onion.net-based information and other data sources |
| onion.net Image Server | Windows service | Unit for automatic image editing. Is included via an extended command of the onion.net Render Engine (extension). |
| onion.net Sharepoint Integration | Windows service | Server and data source for integration of information from the Microsoft SharePoint into the onion.net Render Engine. |
| onion.net Datasource Server | Windows service | Out-of-process data source cache for the onion.net Render Engine |
| onion.net Management Service | Windows service | Asynchronous organisation and clean-up unit. Is used by the onion.net Editor and the onion.net Render Engine. |
The next steps show how to execute a basic installation. This is the kind of installation usually found in a preview environment. In this manual, the installation of the following components will be described:
- onion.net Information Server
- onion.net Management Server
- onion.net Editor
- onion.net Render Engine (Preview)
- onion.net Image Server
A basic installation is made assuming that all components are to be installed on one server. You are, however, free to install and scale the components on different servers. For the configuration options of the components, we refer to the respective configuration details provided on the learners' website.
The chapter onion.net Render Engine (Live) informs you how to configure an onion.net Render Engine for a live environment.
To prepare the installation, an unpacked distribution in the program directory under "onion" is required. In the following, we will explain how to create the directories for the onion.net components and what they are used for. This structure only serves as a guideline, it can be adjusted to your own requirements.
In the empty directory "c:\onion.net", four directories will be created. The first directory called "services" will contain the onion.net services that the onion.net Information Server stores there. In the second directory "web", the web applications - the onion.net Editor(s) and the onion.net Render Engine(s) - will be installed. The other directories "logs" and "cache" will later be used by the components themselves. In the logs directory, the applications should be able to store the log data. The path needs to be configured in the respective configuration files. The cache directory is used by the onion.net Reader Engine to build up the cache. This path also needs to be set up in the configuration file.
At the end of the installation process, the directory structure sould be as follow:

If only one entity of onion.net is to be installed on the server, a directory with the project name (contoso in our example) can, of course, be left out.
topInstallation of the onion.net Information Server
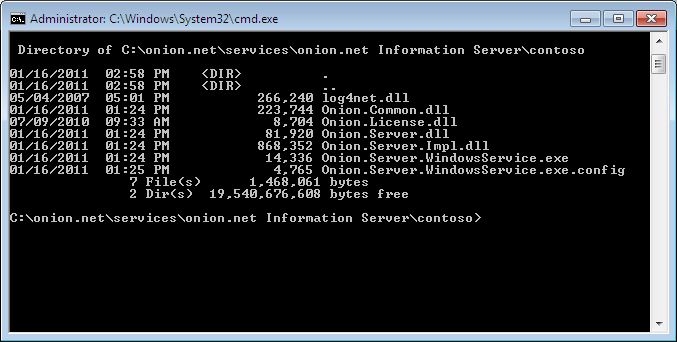
1. Copy the onion.net Information Server into the project directory
Go to the distribution directory and copy the directory into the Information Server directory (in our example to: "c:\onion.net\services\onion.net Information Server") and rename the directory "contoso" or according to your project. Under "c:\onion.net\services\onion.net Information Server\contoso", you should now find the files of the onion.net Information Server.
2. Installation of the service
The required program installutil.exe is already stored in your computer in the directory „%WINDIR%\microsoft.net\framework\v2.0.50727\“.
For the installation, execute this program with the following arguments:
%WINDIR%\Microsoft.NET\Framework\v2.0.50727\installutil.exe /servicename=ONION_contoso Onion.Server.WindowsService.exe
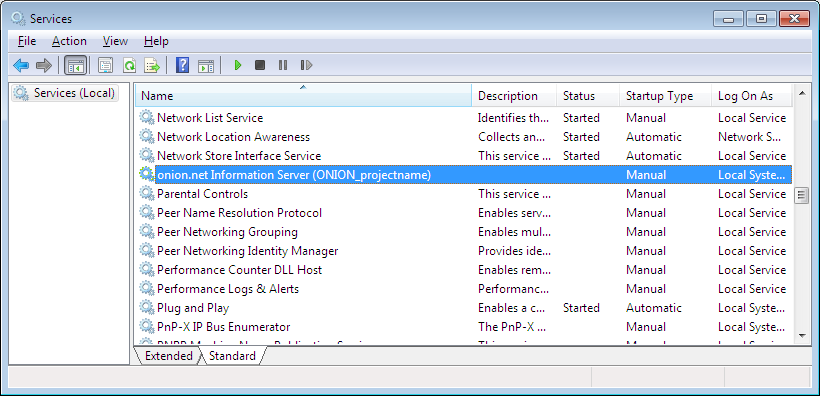
When the command has been executed, the service can be seen in the Windows service console.
If desired, you can now switch the start type from "manual" to "automatic". If available (which is, for example, not the case with Windows XP), you should set the start type to "Automatic (Delayed Start)". If the SQL server runs on the same server, it could happen that the onion.net Information does not start. The reason for this is that the onion.net Information Server tries to connect to the SQL server that is not yet ready for operation. In case of a delayed start, one minute passes until the onion.net Information Server is started. By that time, the SQL server will be ready.
Before you start the service, read the Chapter Rights management below.
The uninstalling of the service is effected with the same command and the additional argument /u.
3. Configuration of the onion.net Information Server
In the target directory of the onion.net Information Server, you will find a configuration file called "Onion.Server.WindowsService.exe.config".
3.1. SQL-Server connection

More information on user rights can be fount in the Chapter Rights management below.
If the SQL server runs on the same server as the onion.net Information Server, "Shared Memory" should be used as protocol. In case of SQL Server Express, this is the only protocol that is active. On the one hand, this protocol is faster because it does not use the network interface and on the other hand, it is safer because the SQL server can thus not be accessed via external sources.
With this protocol, it is necessary to configure another parameter "Network Library" with the value "dbmslpcn" in the connectionString. Otherwise, the system will try to make a connection via named pipes or TCP/IP.
if the SQL Server runs on a different server, you should use TCP/IP. To do this, the protocol must be activated on the SQL Server.
3.2. Caching
The configuration pre-set under configuration/onion/server/cacheSettings has a pre-set Content Caching of approx. 150 MB to relieve the database server. These settings are sufficient for the time being.
3.3. Connection of user repositories
If you wish to connect an LDAP or Active Directory to onion.net, you can configure this under configuration/onion/userRepositories. A description of the application can be found in the comments of the configuration file.
If you do not want this connection, you can keep this section as it is. As a default (configuration/onion/userRepositories/internalDirectory), the login of an onion.net user is disabled for one minute following three faulty log-ins.
3.4. Availbility of services via .NET Remoting
In this chapter, we show you how to configure the connection of the service. The most important setting in case of several entities is the port connection. Port 8087 is configured as standard port. The configured port must not be used by other applications.
3.5. Incident log file
To create a log of incidents, log4net is used. The configuration options of log4net can be found in the Chapter log4net.
With the standard settings, a log file is created in the current directory under "logs\debug.log". Since the installation example contains a log directory under "c:\onion.net", this directory can also be configured, for example: "c:\onion.net\logs\contoso\informationserver.log".
4. Rights management
Two aspects need to be taken into consideration during the allocation of rights. Windows services are started with a user account. Usually, this is the account "Local system".
If you now wish to start the service with your own account, the following needs to be fulfilled.
4.1 Writing of log files
Usually, log4net on the onion.net Information Server is configured in such a way that it creates log files. In order to create, write and delete these files, the service must have the respective rights in the log directory.
4.2. Connection to the SQL server
A connection to the SQL server can be created via the user configured in the configuration file or, in the integrated mode, with the user account on the basis of which the service is running. If you do not want to save access data in the configuration file, you can configure the integrated mode. In this case, however, the user account of this service must receive access rights to the database.
The user from which access to the database is to be made, must be the owner of the database so that tables and stored procedures can be created, updated or deleted during the start.
5. Start the onion.net Information Server
You can now start the service. The first start will take a little longer because the service needs to create the required tables, schemes, users and sets of data in the database.
If an error message appears during the start, the error will be precisely described in the log file.
topInstallation of the onion.net Management Server
The onion.net Management Server is installed only once on computer systems operating an onion.net Editor or an onion.net Render Engine.
1. Installation of the service
Copy the directory „onion.net Management Server" of the distribution into your desired target directory. .NET-based Windows services are installed via the command line program installutil.exe. To do this, simply open a command line and change into the copied directory „onion.net Management Server". In our example, it is called „c:\onion.net\services\onion.net Management Server".
The required program installutil.exe is already stored on your computer in the directory „%WINDIR%\microsoft.net\framework\v2.0.50727\". For the installation, execute this program with the following arguments:
%WINDIR%\Microsoft.NET\Framework\v2.0.50727\installutil.exe Onion.Management.WindowsService.exe
Switch the start type of the service in the service management of the server from "manual" to "automatic".
We will now proceed with the required configuration steps. In the target directory, you will find the configuration file „Onion.Management.WindowsService.exe.config".
2. Configuration of the onion.net Management Server
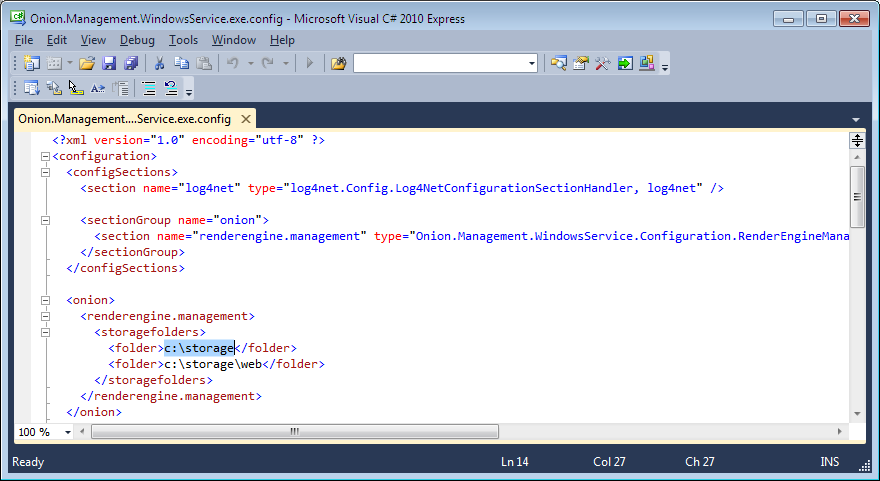
In our installation example, the directories "c:\onion.net\cache" and "c:\onion.net\cache\web" need to be configured.
3. Access rights of the user account
The user account used for executing the service must have the respective read and write rights in the configured directories.
If an onion.net Editor is configured with the onion.net Management Server, the user account must have the rights to read and write in the functions directory of the onion.net Editor. In our example, this is the directory "c:\onion.net\web\contoso\editor\functions".
topInstallation of the onion.net Image Server
The onion.net Image Server to which to onion.net Render Engines will have access independent from the project needs to be installed only once. A scalable adjustment of the onion.net Image Server performance is possible and can be configured in the onion.net Render Engine.
1. Installation of the service
Copy the directory „onion.net Image Server" of the distribution into your desired target directory. .NET-based Windows services are installed via the command line program installutil.exe. To do this, simply open a command line and change into the copied directory „onion.net Image Server". In our example, it is called „c:\onion.net\services\onion.net Image Server".
The required program installutil.exe is already stored in your computer in the directory „%WINDIR%\microsoft.net\framework\v2.0.50727\". For the installation, execute this program with the following arguments:
%WINDIR%\Microsoft.NET\Framework\v2.0.50727\installutil.exe Onion.ImageServer.WindowsService.exe
Switch the start type of the service in the service management of the server from "manual" to "automatic".
The server is ready for operation in its standard configuration. If a non administrative account is being used you'll need to apply a proper urlacl setting:
netsh http add urlacl url=http://*:8082/ user=SERVERNAME|DOMAIN\ACCOUNT
Other configuration options are described in the configuration details of the onion.net Image Server.
topInstallation of the onion.net Editor
The operation of the onion.net Editor requires the server role webserver (IIS) with the activated role service "Application Development Features/ASP.NET".
1. Copy the Editor
In this installation, we add the onion.net Editor to the standard website. To do this, copy the directory „onion.net Editor" of the distribution into your desired target directory. In our example, this is the directory "c:\onion.net\web\contoso\editor".
2. Create a webapplication
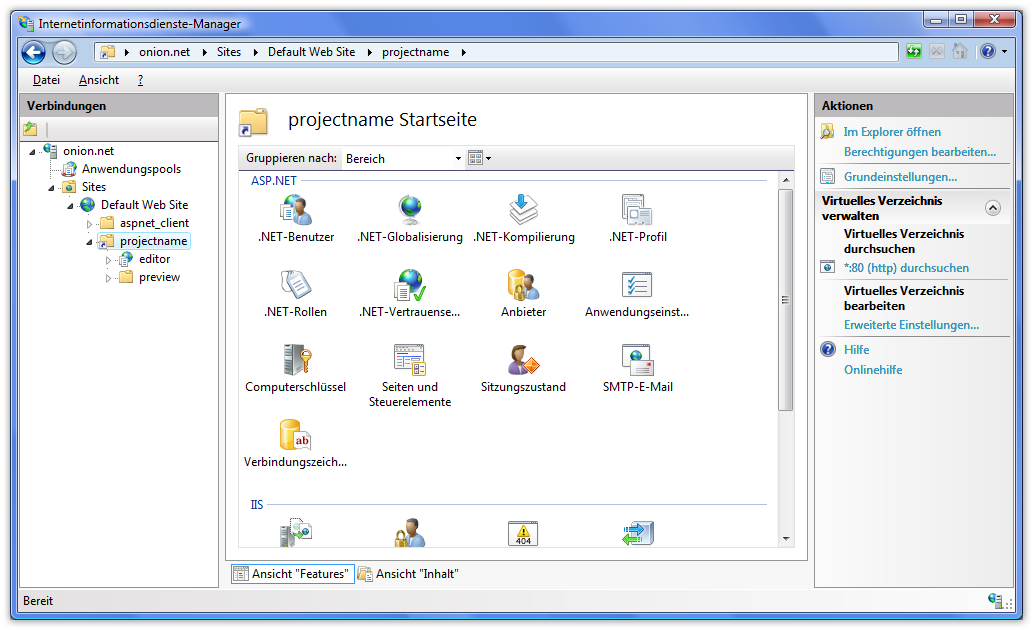
Open the „Internet Information Services manager“ now.
 2.1. Add a virtual directory

If the onion.net Editor and not the directory with the project name is placed directly under "c:\onion.net\web", continue with Chapter 2.2.
In any other case, create a virtual directory underneath the standard website and configure the project name as alias and the project directory "c:\onion.net\web\contoso" as path. The newly created virtual directory will then appear underneath the website.
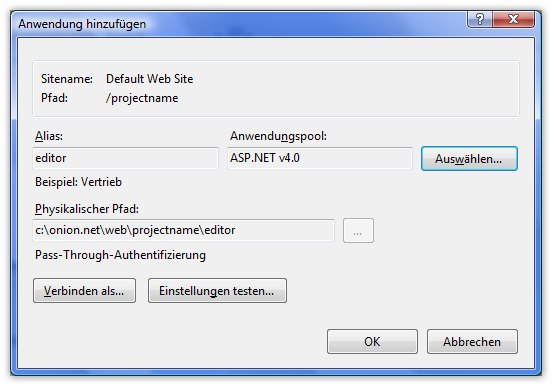
2.2. Add an IIS application

If you performed the steps described in Chapter 2.1, you can expand the virtual directory and open the context menu by clicking on the directory "editor" with the right mouse button. Then click on "Convert to application".
In both cases, you will then see the same window. In the input field Alias, enter the name "editor". As application pool, select an application pool from .NET Framework 2.0 or more recent and the pipeline mode Classic. For the physical path, select the editor directory. In our example, this is the path "c:\onion.net\web\contoso\editor".
If you have clicked on "Convert to application", all fields are already filled. Please check if the selected application pool fulfils the prerequisites and change to a different application pool, if and as required.
3. Adjust the configuration file
Open the file „web.config“ from the target directoy.
3.1. Configure the onion.net Information Server

3.2. Configure Editor Customizing
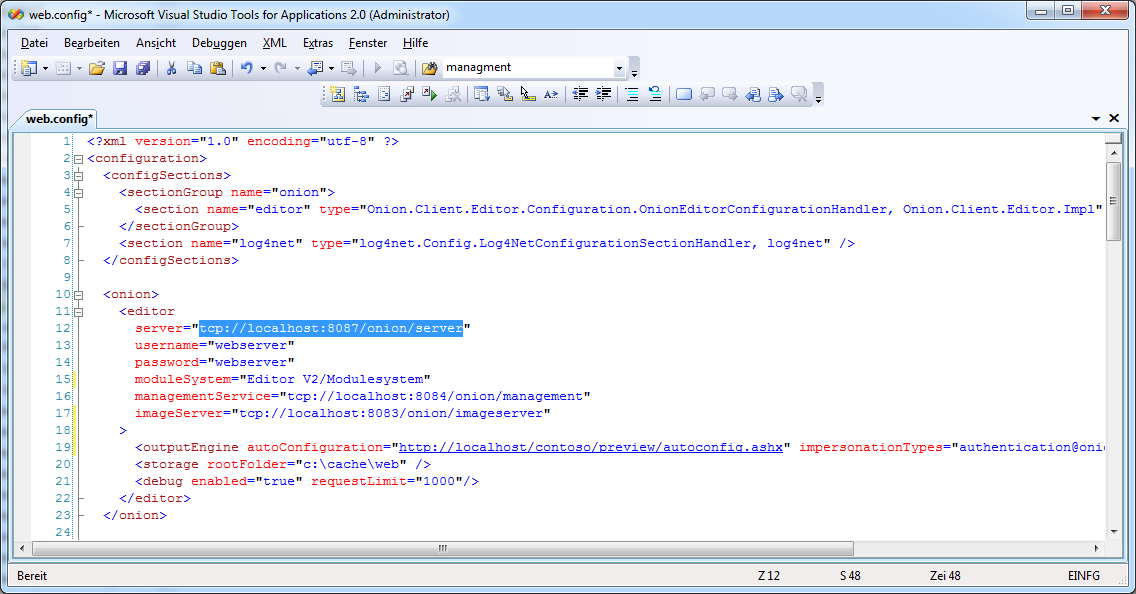
If the Editor Customizing has been or is to be imported, the following line under "configuration/onion/webeditor" needs to be activated and expanded.
<configuration onionPath="Editor" managementService="tcp://localhost:8084/onion/management" />
The attribute "onionPath" defines the path to the Editor Customizing in the data structure. In our example, the Editor Customizing is located underneath the root document in onion.net and is called "Editor". The second attribute "managementService" configures the .NET Remoting URL to the onion.net Management Server. This server is required, among other things, to write the logos maintained in the Editor Customizing into the functions directory.
3.3. Configure the preview
In order to be able to call the preview Render Engine from the Editor, the URL of the Render Engine must be configured. The URL is configured under "configuration/onion/webeditor" as follows:
<outputEngine autoConfiguration="http://localhost/contoso/preview/autoconfig.ashx" />
A page is configured in the onion.net Render Engine. The web application is configured under http://localhost/contoso/preview. The autoconfig.ashx is a handler that is called to check whether the Render Engine is working. If this is not the case, the preview button in the Editor will not be displayed.
You can now open the onion.net Editor via the Internet Explorer. In our test installation, it has the URL http://localhost/contoso/editor.
3.4. Log of incidents
For the protocol of incidents, log4net is used. The configuration options of log4net can be found in the Chapter log4net.
With the standard settings, a log file is created in the current directory under "logs\debug.log". Since the installation example contains a log directory under "c:\onion.net", this directory can also be configured, for example: "c:\onion.net\logs\contoso\editor.log".
4. Start the ASP.NET state server
Open the Windows service console and start the ASP.NET state service. The onion.net Editor uses this service to maintain the sessions following a restart of the application so that the user does not have to log in again.
topInstallation of the onion.net Editor
The requirement for running the onion.net Editor is the server role Webserver (IIS) with activated role service “Application development/ASP.NET “, as well as at least .NET Framework 4.0.
1. Copying the Editor
In this installation, we add the onion.net Editor to the default web page. To do this, copy the directory “onion.net Editor v2” of the distribution into your target directory. In our example this is “ c:\onion.net\web\contoso\editor ”.
2. Create web application
Now open “Internet Information Services manager”.
 2.1. Add virtual directory
If you immediately have the onion.net Editor and not the directory with the project name under “ c:\onion.net\web ”, continue with point 2.2.
Otherwise create a Virtual Directory below the default web page and indicate the project name as the alias and the project directory “ c:\onion.net\web\contoso ” as the path. The created virtual directory will then appear underneath the web page.
2.2. Add IIS application
If have performed point 2.1, then you can expand the virtual directory and right-click on the directory “editor” in order to open the context menu. Now click on “Convert into application”.
In both cases you will now see the same window. Assign the name “editor” for the alias input field. As the application pool, select one which is selected to .NET Framework 4.0 or newer and which is pipeline-mode integrated. For the physical path, select the editor directory. In our example it is the path “ c:\onion.net\web\contoso\editor ”.
If you have clicked on “Convert into application”, all fields will already be pre-filled. Check however whether the selected application pool fulfils the requirements and change the application pool if necessary.
3. Adapt configuration file
Open the file “web.config” from the target directory.
3.1. Configure onion.net Information Server
3.2. Configure module system
If the module system is activated or is to be activated, you must configure the attribute moduleSystem with the path to the module system (Editor V2/Modulesystem) under configuration/onion/editor.
3.3. Configure management server
The onion.net Management Server is needed for the module system if necessary, in order to provide project DLLs for the editor. For this purpose, the attribute managementServer under configuration/onion/editor is configured. The value must be a remoting-URL. If the service has been installed locally, without changing the port, then the value for the attribute is tcp: //localhost: 8084/onion/management.
3.4. Configure image server
The editor needs the onion.net Image Server for displaying graphics in forms and object structure windows. Graphics are scaled using the server. The configuration of the Image Server takes place in the section configuration/onion/editor. The attribute imageServer must be configured there with a list, separated by blanks, of remoting-urls. If the onion.net Image Server has been installed locally, without changing the port, then the value for the attribute is tcp://localhost: 8083/onion/imageserver. Several onion.net image servers can also be indicated if the onion.net Image Server does not run on the same server and a system stability must be ensured.
3.5. Configure cache directory
An onion.net Render Engine is integrated into the onion.net Editor for the display of parts of the editor. A cache directory must therefore be indicated in the configuration file. This directory is indicated in the attribute rootFolder under configuration/onion/editor/storage.
3.6. Configure tracing for the editor
In the editor, own trace information can be displayed which is created in the routines of the editor. For this purpose, you can activate the latter in the configuration file. Under configuration/onion/editor there is an element “debug” with the attributes enabled and requestLimit. The attribute enabled activates the trace. Using requestLimit it is indicated how many items can be listed in the trace before the oldest items from the trace are deleted.
3.7. Configure preview
So that the preview Render Engine can be called from the editor, the URL to the Render Engine must be announced. The URL is configured under configuration/onion/editor as follows:
A page is configured in the onion.net Render Engine. The web application is configured under http://localhost/contoso/preview . The autoconfig.ashx is a handler which is called in order to check whether the Render Engine is running. If this is not the case, then the preview button is not shown in the editor.
You can now open the onion.net Editor with a supported browser. In our test installation, this is the URL http://localhost/contoso/editor.
3.4. Event logging
log4net is used as event logging. You can consult the configuration options for log4net under log4net.
In the default setting, a log file is created in the current directory under logs\debug.log. Since there is a log directory under “c:\onion.net” in the example installation, this directory can also be indicated, e.g.: “c:\onion.net\logs\contoso\editor.log”.
4. ASP.NET Start health service
Open the Windows service console and start the ASP.NET health service. The onion.net Editor uses this service so that the sessions are kept after restarting the application and the user does not have to log in again.
topInstallation of the onion.net Render Engine
The operation of the onion.net Editor requires the server role webserver (IIS) with the activated role service "Application Development Features/ASP.NET".
1. Copy the onion.net Render Engine
In this installation, we add the onion.net Render Engine to the standard website. To do this, copy the directory „onion.net Render Engine" of the distribution into your desired target directory. In our example, this is the directory "c:\onion.net\web\contoso\preview".
2. Create a webapplication
Open the „Internet Information Services manager“ now.
2.1. Add a virtual directory
If you have installed the onion.net Editor on the same server, continue with Chapter 2.2. You can also skip this Chapter if you pasted the onion.net Render Engine instead of the directory with the project name directly under "c:\onion.net\web".
In any other case, create a virtual directory underneath the standard website and configure the project name as alias and the project directory "c:\onion.net\web\contoso" as path. The newly created virtual directory will then appear underneath the website.
2.2. Add an IIS application
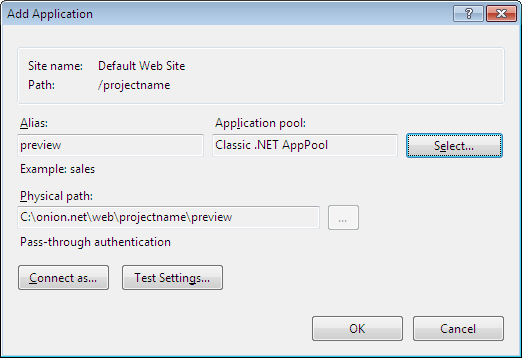
If you performed the steps described in Chapter 2.1, you can expand the virtual directory and open the context menu by clicking on the directory "preview" with the right mouse button. Then click on "Convert to application".
In both cases, you will then see the same window. In the input field Alias, enter the name "preview". As application pool, select an application pool from .NET Framework 2.0 or more recent and the pipeline mode Classic. For the physical path, select the Render Engine directory. In our example, this is the path "c:\onion.net\web\contoso\preview".
If you have clicked on "Convert to application", all fields are already filled. Please check if the selected application pool fulfils the prerequisites and change to a different application pool, if and as required.
3. Adjust the configuration file
Open the file „web.config“ from the target directory.
 3.1. Configure the onion.net Data Source

With the onion.net Render Engine, it is possible to connect multiple data sources. All data sources are listed in the configuration section "dataSources" (search for „<dataSources>" to find this section). Change the IP address if the onion.net Information Server has been installed on a different server in the network.
3.2. Adjust paths to the application
The onion.net Render Engine has been designed in such a way that URL rewriting is supported and that URLs can be adjusted to individual needs. Due to this, the paths must be configured to generate correct references. To do this, replace alle entries of „/renderengine/" by "/contoso/preview/".
 3.3. Configure the cache directory

The onion.net Render Engine reduces the load of the onion.net Information Server by caching strategies. To achieve this, rendering results are buffered in the working memory or on the hard disk drive. These directories must not be accessed via the webserver. Old cache directories are deleted from the onion.net Management Server in a background process. Configure a directory in the configuration chapter "storage". In our example, the correct path is "c:\onion.net\cache\web".
Note: The efficiency of the memory medium linked to this directory increases the output performance of the system.
 3.4. Activate session-based Enterprise ChangeSets

With the preview environment, editors have the possibility to integrate changes of Enterprise ChangeSets into the preview. The onion.net Render Engine thus switches to the ChangeSet activated for the respective editor.
To do this, add the attribute "sessionBasedContext" with the value "true" in the configuration section "renderengine.web".
 3.5. Activate Editing Services and configure the Editor URL
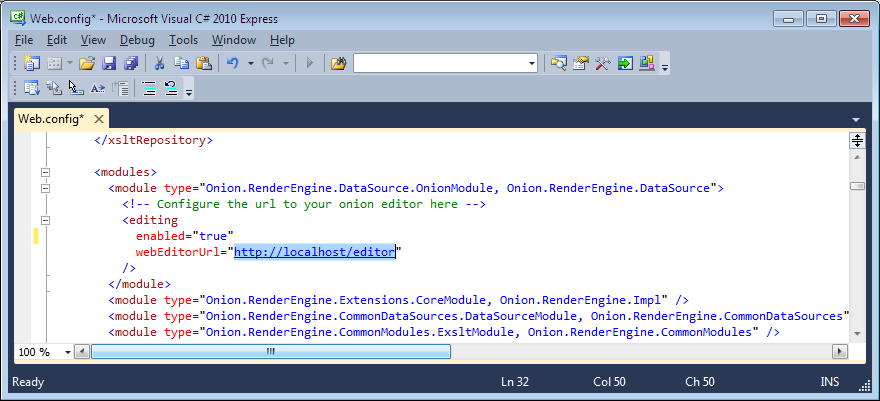
The preview environment can be equipped with a function for inline-editing. Make the following change in the configuration module (search for "modules" to find the section): Add the value "true" to the attribute "enabled" within the element "editing" and change the URL under webEditorUrl to that of the editor. In our example, this is the path http://localhost/contoso/editor.
 3.6. Configure the Image Server
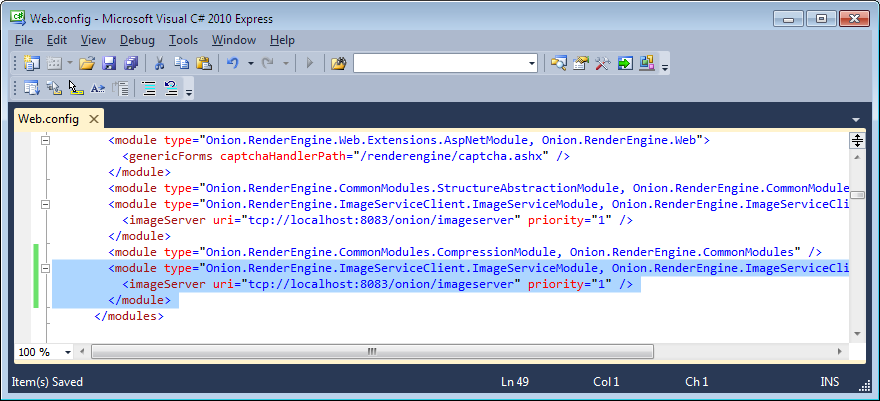
Add another module in the section modules as shown in the Figure.
<module type="Onion.RenderEngine.ImageServiceClient.ImageServiceModule, Onion.RenderEngine.ImageServiceClient">
  <imageServer uri="tcp://localhost:8083/onion/imageserver" priority="1" />
</module>
You can configure any number of Image Servers. To add more Image Servers, you need to add more "imageServer" elements in the module. The higher the priority, the more frequently the Image Server will be addressed. A configured priority of 2:1 with two Image Servers thus means that the first Image Server is twice as often addressed as the second one. If one Image Server fails, a search for the next available Image Server will be initiated.
 3.7. Protect the preview
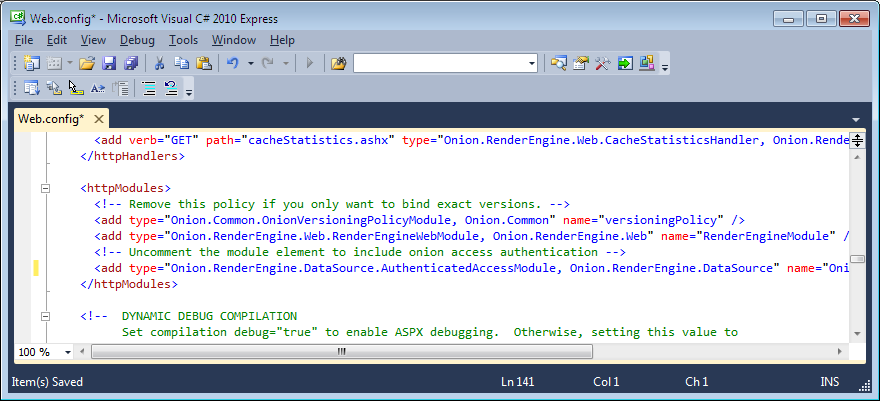
You have the possibility to protect the preview by a password. Access is limited to Users who have the role "Editor". Delete the XML comment of the module AuthenticatedAccessModule in the configuration section "httpModules".
3.8. Log of incidents
For the protocol of incidents, log4net is used. The configuration options of log4net can be found in the Chapter log4net.
With the standard settings, a log file is created in the current directory under "logs\debug.log". Since the installation example contains a log directory under "c:\onion.net", this directory can also be configured, for example: "c:\onion.net\logs\contoso\preview.log".
topInstallation of the onion.net Render Engine
The operation of the onion.net Editor requires the server role webserver (IIS) with the activated role service "Application Development Features/ASP.NET". In the live environment, we recommend to use the module Application Request Routing (ARR) for IIS 7 in order to be able to use URL Rewriting.
For the installation of the live environment, we proceed in a slightly different way to that of the preview environment. In this case, we will not put the onion.net Render Engine under "c:\onion.net\web\contoso\preview" but under "c:\onion.net\web\www.contoso.com" instead.
1. Copy the onion.net Render Engine
In this installation, we create a new website with an onion.net Render Engine. To do this, copy the directory „onion.net Render Engine" of the distribution into your desired target directory. In our example, this is the directory "c:\onion.net\web\www.contoso.com".
2. Create a website
Open the „Internet Information Services manager“ now.
 2.1. Add a new website
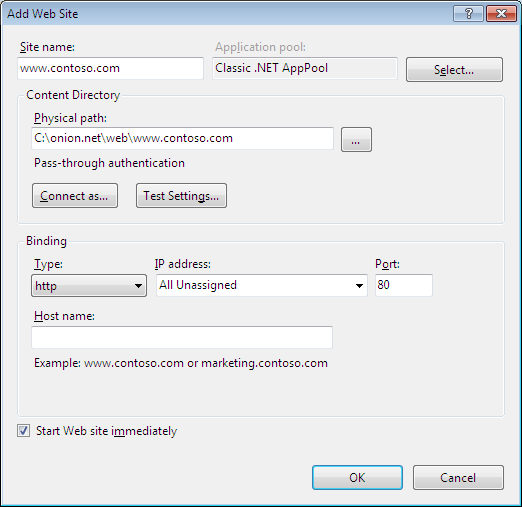
Click on Sites with the right mouse button and add a new website.
3. Adjust the configuration file
Open the file „web.config“ from the target directory.
3.1. Configure the onion.net Data Source
With the onion.net Render Engine, it is possible to connect multiple data sources. All data sources are listed in the configuration section "dataSources" (search for „<dataSources>" to find this section). Change the IP address if the onion.net Information Server has been installed on a different server in the network.
3.2. Adjust paths to the application
The onion.net Render Engine has been designed in such a way that URL rewriting is supported and that URLs can be adjusted to individual needs. Due to this, the paths must be configured to generate correct references. To do this, replace „/renderengine/" by "/projectname/preview/".
3.3. Configure the cache directory
The onion.net Render Engine reduces the load of the onion.net Information Server by caching strategies. To achieve this, rendering results are buffered in the working memory or on the hard disk drive. These directories must not be accessed via the webserver. Old cache directories are deleted from the onion.net Management Server in a background process. Configure a directory in the configuration section "storage". In our example, the correct path is "c:\onion.net\cache\web".
Note: The efficiency of the memory medium linked to this directory increases the output performance of the system.
3.4. Configure the Image Server
Add another module in the section modules as shown in the Figure.
<module type="Onion.RenderEngine.ImageServiceClient.ImageServiceModule, Onion.RenderEngine.ImageServiceClient">
  <imageServer uri="tcp://localhost:8083/onion/imageserver" priority="1" />
</module>
You can configure any number of Image Servers. To add more Image Servers, you need to add more "imageServer" elements in the module. The higher the priority, the more frequently the Image Server will be addressed. A configured priority of 2:1 with two Image Servers thus means that the first Image Server is twice as often addressed as the second one. If one Image Server fails, a search for the next available Image Server will be initiated.
3.5. Log of incidents
For the protocol of incidents, log4net is used. The configuration options of log4net can be found in the Chapter log4net.
With the standard settings, a log file is created in the current directory under logs\debug.log. Since the installation example contains a log directory under "c:\onion.net", this directory can also be configured, for example: "c:\onion.net\logs\contoso\live.log".
4. Configuration of the Application Request Routing (ARR)
Following the installation, the ARR will provide a load balancing and URL rewriting. You should now use the URL Reqriting from the ARR.
The functioning principle of URL rewriting can be explained with a few words. There is a website accessed by web requests. On this website, URL rewrite rules have been defined so that the requests are redirected to a configured server farm and rewritten, if and as required. In the server farm, one or several servers (IP address and port) have been configured. These servers are the onion.net Render Engines.
The following steps describe how to remove the handler page.ashx from the URLs.
4.1. Change the port of the webapplication
Change the port to another one, for example to port 50,000. In order to have a better overview, you should rename the website from "www.contoso.com" to "www.contoso.com (50000)". The onion.net Render Engine can now be accessed via port 50,000.
4.2. Create a new webfarm
Create a new webfarm "www.contoso.com" now and add a new server.
Configure localhost or 127.0.0.1 as server address. Show the extended settings and expand the item applicationRequestRouting. Set the httpPort from port 80 to port 50.000. Then click on "Add".
Click on "Finish".
Decline the following dialog by clicking "No".
4.3. Create a website for ARR
First, we need another directory structure. Create the directory "arr" under "c:\onion.net", and then create "www.contoso.com" under this new directory.
Now create another website in the IIS. As site name, you should now use "www.contoso.com" again and select "c:\onion.net\arr\www.contoso.com" as physical path. The port connection is port 80 again.
4.4. Define ARR rules
Click on the module "URL Rewrite" in the category IIS of the newly created website. Create the following rules.
4.4.1. URL for captcha graphics
Add an empty rule.
- Enter the name "Captcha".
- Select the item "Wildcards" under "Using".
- Enter "captcha.aspx" (without inverted commas) into the input field "Pattern"
- Enter http://www.contoso.com/{R:0} in the field "Rewrite URL" further down. "www.contoso.com" is the name of the webfarm.
- Activate the field "Stop processing of subsequent rules".
4.4.2. URL for binary data
Add another empty rule.
- Enter the name "Binaries".
- Select "Wildcards" under "Using".
- Enter "binary.ashx*" (without inverted commas) into the input field "Pattern"
- Enter "http://www.contoso.com/binary.ashx{R:1}" in the field "Rewrite URL" further down.
- Activate the field "Stop processing of subsequent rules".
4.4.3. URL for websites
Add another empty rule to create a third rule.
- Enter the name "Pages".
- Select the item "Wildcards" under "Using".
- Enter "*" (without inverted commas) into the input field "Pattern".
- Enter "http://www.contoso.com/page.ashx/{R:0}" in the field "Rewrite URL" further down.
- Activate the field "Stop processing of subsequent rules".
The directory "c:\onion.net\arr\www.contoso.com" now contains a web.config. Its contents should be as follows:
<?xml version="1.0" encoding="UTF-8"?>
<configuration>
    <system.webServer>
        <rewrite>
            <rules>
                <rule name="Captcha" patternSyntax="Wildcard" stopProcessing="true">
                    <match url="captcha.ashx" />
                    <action type="Rewrite" url="http://www.contoso.com/captcha.ashx" />
                </rule>
                <rule name="Binaries" patternSyntax="Wildcard" stopProcessing="true">
                    <match url="binary.ashx*" />
                    <action type="Rewrite" url="http://www.contoso.com/binary.ashx{R:1}" />
                </rule>
                <rule name="Pages" patternSyntax="Wildcard" stopProcessing="true">
                    <match url="*" />
                    <action type="Rewrite" url="http://www.contoso.com/page.ashx/{R:0}" />
                </rule>
            </rules>
        </rewrite>
    </system.webServer>
</configuration>
4.5. Configuration of the onion.net URI format
The section uriFormat in the web.config of the onion.net Render Engine now needs to be adjusted. In the section builder/format, the attribute literal-path is set to empty because page.ashx should no longer appear in the URL.
To the subsection parser within the section uriFormat, the format element with the attributes literal-path and binary-path now needs to be added as child element.
The section should look as follows:
<uriFormat staticFormatterPath="/binary.ashx/data" staticParserPath="/binary.ashx/data">
  <builder type="Onion.RenderEngine.DataSource.OnionUriPathFormat, Onion.RenderEngine.DataSource">
    <format
   literal-path=""
      binary-path="/binary.ashx"
      lookup-method="uri"
      quicklinks-method="quicklinks:default"
      quicklinks-method-parameter="language"
      force-lower-case="true"
      invalid-character="-"
    />
  </builder>
  <parser type="Onion.RenderEngine.DataSource.OnionUriPathFormat, Onion.RenderEngine.DataSource">
    <format literal-path="/page.ashx" binary-path="/binary.ashx" />
  </parser>
</uriFormat>