Installation of the onion.net Render Engine
The operation of the onion.net Editor requires the server role webserver (IIS) with the activated role service "Application Development Features/ASP.NET".
1. Copy the onion.net Render Engine
In this installation, we add the onion.net Render Engine to the standard website. To do this, copy the directory „onion.net Render Engine" of the distribution into your desired target directory. In our example, this is the directory "c:\onion.net\web\contoso\preview".
2. Create a webapplication
Open the „Internet Information Services manager“ now.
 2.1. Add a virtual directory

If you have installed the onion.net Editor on the same server, continue with Chapter 2.2. You can also skip this Chapter if you pasted the onion.net Render Engine instead of the directory with the project name directly under "c:\onion.net\web".
In any other case, create a virtual directory underneath the standard website and configure the project name as alias and the project directory "c:\onion.net\web\contoso" as path. The newly created virtual directory will then appear underneath the website.
2.2. Add an IIS application
If you performed the steps described in Chapter 2.1, you can expand the virtual directory and open the context menu by clicking on the directory "preview" with the right mouse button. Then click on "Convert to application".
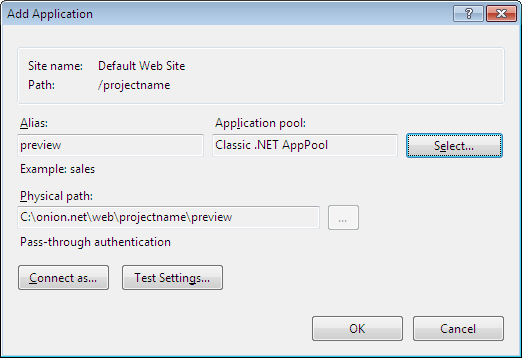
In both cases, you will then see the same window. In the input field Alias, enter the name "preview". As application pool, select an application pool from .NET Framework 2.0 or more recent and the pipeline mode Classic. For the physical path, select the Render Engine directory. In our example, this is the path "c:\onion.net\web\contoso\preview".
If you have clicked on "Convert to application", all fields are already filled. Please check if the selected application pool fulfils the prerequisites and change to a different application pool, if and as required.
3. Adjust the configuration file
Open the file „web.config“ from the target directory.
 3.1. Configure the onion.net Data Source

With the onion.net Render Engine, it is possible to connect multiple data sources. All data sources are listed in the configuration section "dataSources" (search for „<dataSources>" to find this section). Change the IP address if the onion.net Information Server has been installed on a different server in the network.
3.2. Adjust paths to the application
The onion.net Render Engine has been designed in such a way that URL rewriting is supported and that URLs can be adjusted to individual needs. Due to this, the paths must be configured to generate correct references. To do this, replace alle entries of „/renderengine/" by "/contoso/preview/".
 3.3. Configure the cache directory

The onion.net Render Engine reduces the load of the onion.net Information Server by caching strategies. To achieve this, rendering results are buffered in the working memory or on the hard disk drive. These directories must not be accessed via the webserver. Old cache directories are deleted from the onion.net Management Server in a background process. Configure a directory in the configuration chapter "storage". In our example, the correct path is "c:\onion.net\cache\web".
Note: The efficiency of the memory medium linked to this directory increases the output performance of the system.
 3.4. Activate session-based Enterprise ChangeSets

With the preview environment, editors have the possibility to integrate changes of Enterprise ChangeSets into the preview. The onion.net Render Engine thus switches to the ChangeSet activated for the respective editor.
To do this, add the attribute "sessionBasedContext" with the value "true" in the configuration section "renderengine.web".
 3.5. Activate Editing Services and configure the Editor URL
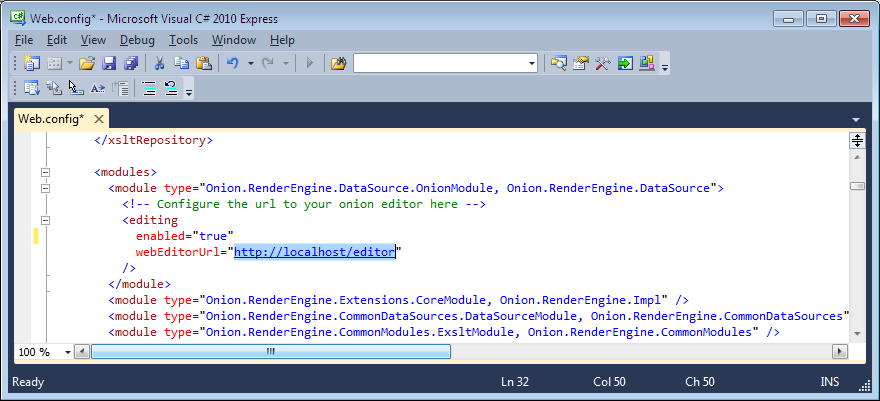
The preview environment can be equipped with a function for inline-editing. Make the following change in the configuration module (search for "modules" to find the section): Add the value "true" to the attribute "enabled" within the element "editing" and change the URL under webEditorUrl to that of the editor. In our example, this is the path http://localhost/contoso/editor.
 3.6. Configure the Image Server
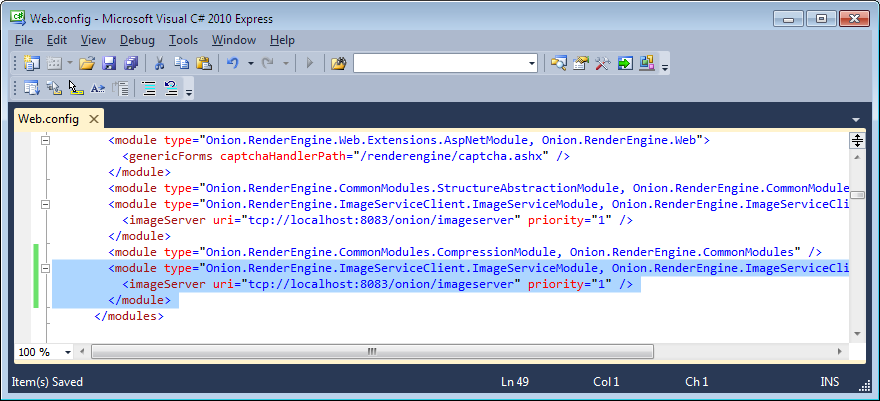
Add another module in the section modules as shown in the Figure.
<module type="Onion.RenderEngine.ImageServiceClient.ImageServiceModule, Onion.RenderEngine.ImageServiceClient">
  <imageServer uri="tcp://localhost:8083/onion/imageserver" priority="1" />
</module>
You can configure any number of Image Servers. To add more Image Servers, you need to add more "imageServer" elements in the module. The higher the priority, the more frequently the Image Server will be addressed. A configured priority of 2:1 with two Image Servers thus means that the first Image Server is twice as often addressed as the second one. If one Image Server fails, a search for the next available Image Server will be initiated.
 3.7. Protect the preview
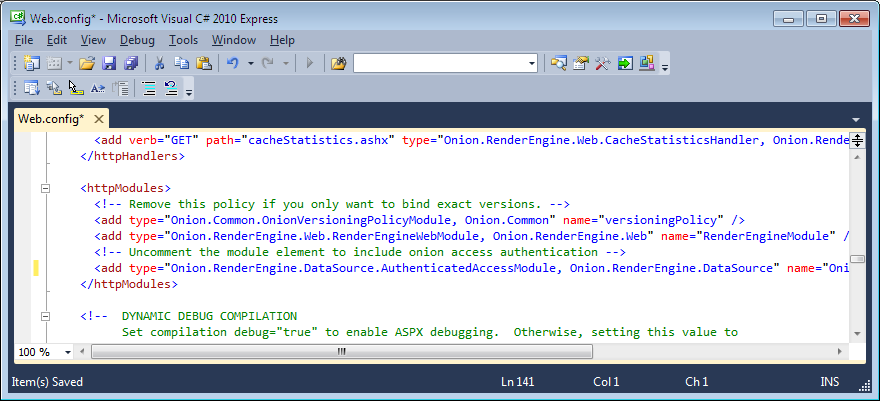
You have the possibility to protect the preview by a password. Access is limited to Users who have the role "Editor". Delete the XML comment of the module AuthenticatedAccessModule in the configuration section "httpModules".
3.8. Log of incidents
For the protocol of incidents, log4net is used. The configuration options of log4net can be found in the Chapter log4net.
With the standard settings, a log file is created in the current directory under "logs\debug.log". Since the installation example contains a log directory under "c:\onion.net", this directory can also be configured, for example: "c:\onion.net\logs\contoso\preview.log".